Formula X The System XCEL

Formula X The System XCEL 1

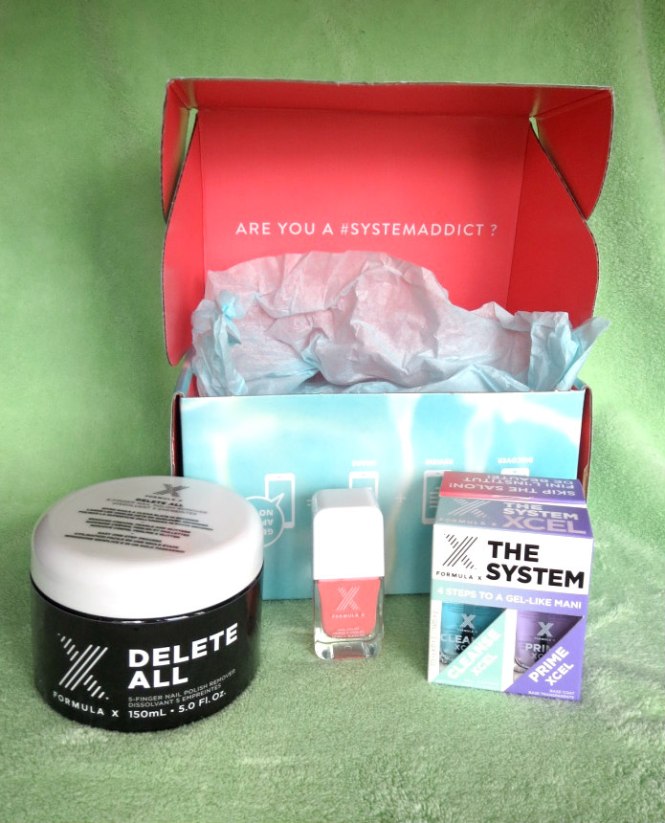
I used to be a habitual nail picker, and my nails were never more than tiny, unsightly stubs. Thankfully, a few years ago, I kicked the habit, and I’ve been addicted to painting my nails ever since! That’s why I was so happy when Influenster sent me this new nail care set from Formula X!
Formula X The System XCEL 2

The System EXCL is a customizable 4-part nail treatment system for creating the perfect at-home manicure. You can select any polish for the nail color, and the remaining 3 steps help prep your nails and ensure your manicure will last.Formula X The System XCEL 3

The packaging is so cute on these bottles. The large white cap is removable, and a smaller handle is beneath so you have more control while polishing. Before I started my manicure though, I had to remove my old polish.

Formula X The System XCEL 4.5

Thankfully, I also received Formula X Delete All 5 finger polish remover. This stuff was no joke.
Formula X The System XCEL 4

Delete All is seriously removed all of my old polish within seconds. When you open it up, a formula soaked sponge sits inside. There are 5 holes (one for each finger, obvi) that you simply slip your fingers in. I sort of swiveled mine around a bit for a few seconds. Once I slid out my fingers, ALL OF MY POLISH WAS GONE. Miraculous, y’all. This would be so convenient to travel with or just to have around for a quick polish change. Formula X The System XCEL 5.5

After my nails were polish-free, I moved onto the first step in The System XCEL, CLEANSE XCEL. This step is a quick-drying formula that helps remove natural oils from your nails and condition them before you apply any polish. Formula X The System XCEL 6

Once you apply that, the next step is PRIME XCEL. This base coat helps whatever polish you use bond with your nail bed while preventing it from staining. This step takes longer to try than the CLEANSE XCEL, but it really helped my polish go on smoothly. After it dries, you can finally move onto the fun part…your polish color! I chose to use the Formula X polish I was sent, TGIF. It’s a beautiful pinky-coral shade.

Formula X The System XCEL 7

The TGIF brush was thinner than the other steps in the system, but otherwise I really liked it! The color is beautiful, and it was opaque after two coats, which is important to me! I waited for both coats to dry before moving on to the final step, SHINE XCEL. Formula X The System XCEL 8

SHINE XCEL is the glossy, quick-dry top coat that is supposed to give your manicure gel-like protection for long-lasting results. I must say, I’m impressed! It did dry pretty quickly, and it really gave my nails a beautiful shine. They definitely feel nice and strong as well! I’ve shelled shrimp, showered, shoveled snow (not really, but you get the idea), and so far, I’m chip-free! I hope it wears well for a long time!

Formula X The System XCEL 9

Overall, I’m very pleased with the The System XCEL! I think it could easily replace a salon manicure. My favorite part was the brushes on the 3 clear steps. After some research I can see why.  Apparently they feature the Xpert Strokes Brush, which was just redesigned and features a wider brush with 440 bristles that creates a custom glide and streak-free finish. I wish all polishes had that brush. It’s amazing!Formula X The System XCEL 10

At $32 for the set (which includes whichever Formula X polish color you choose!), this would pay for itself in just a couple of uses, if you consider the cost of a manicure at a salon. If you’re big on at-home manicures like me, I would happily recommend The System XCEL!

Which color should I try next??

Retro Siggy


Disclaimer: I received the Formula X products complimentary from Influenster, but all opinions are my own. 

Continue Reading

Easy Minimal Nail Art

Easy Nail Art 0

I’m no artist. Let me get that out of the way up front! My handwriting isn’t great, I can’t draw worth a poot, and in general, I’m not super artistic. However, I love painting my nails (okay…that’s a lie, but I love having painted nails), and I’ve always wanted to add a fun accent to them. I’m not big on the different color accent nail trend, but I still love a fun pop of nail art, and this is the perfect compromise!

Easy Nail Art 1

All you need for this minimal nail art look is Scotch tape and two colors of polish. I used Sally Hansen Complete Salon Manicure in Naked Ambition  (previous review here) and Revlon Nail Polish in Minted. For an even more minimalist look, you could paint the nail art on your naked nail, which would only require one polish (duh.).

Easy Nail Art 2

Paint your nails whatever base color you choose. Once they are completely dry, tear off two pieces of Scotch tape. I usually stick the tape on my hand and peel it off once to pick up some dead skin cells make it slightly less sticky. It needs to be sticky enough to stick onto your nail, but not so sticky it will pull off your base polish.

Stick the tape to your nails to form a triangle shape however large or small you’d like.

Easy Nail Art 3

Use your secondary color to paint over the tape and fill in the triangle shape you created. As soon as you’re done painting, peel off the tape to reveal your perfect triangle! Make sure you peel off the tape while the polish is wet, so you don’t accidentally pull up the dry polish with the tape. You can also add a top coat afterwards, if that’s your jam.

Easy Nail Art 4

Voilà! You’re done! I think this look is so fun, and I love that you can create so many looks with different colors and without any special nail art tools.

Easy Nail Art 5

You could paint the triangles on every nail or just one finger, like I did. The tape is fun to play around with as well because you could use it to make any number of shapes or designs on your nails.

Easy Nail Art 6

If you try this nail art, share a picture of it on Instagram and tag me! I’d love to see! 🙂 Feel free to pin the image below to help you remember the simple steps in the future!Easy Nail Art 7

As always, thanks for reading!

Siggy paint

This post contains affiliate links, which means if you make a purchase using these links, I may receive a small percentage of the profit at no additional cost to you. Thank you for supporting Hoots of a Night Al!


Continue Reading

Nail Polish Removal Hack!

0

Does anyone else out there paint their own nails still? I love having fresh polish on my nails, but one of my least favorite things to do is remove it! I feel like some polishes (like glitter!) can be so stubborn and hard to get off. However, a couple of years ago, I stumbled upon this “hack.” With nail polish remover and ONE cotton ball, I can remove ALL of my polish quickly and easily! Read on to see how!

2

You can use acetone (which is harsher on your nails) or nail polish remover. Simply pour a small amount into the cap. Next get one cotton ball and roll it out into a strip like the picture below.

3

Gently, tear your cotton ball into ten small pieces.

4

Dip each piece into the nail polish remover, and press it onto your  nail making sure any part with polish is being touched by the polish remover. I typically do one hand at time.

5

Wait for around 15 seconds, grab the cotton ball piece, and slide it off your nail with some slight pressure. Voilà! Just like that, all of your polish is gone! 6

Like I said, I do one hand at a time, and it just takes a couple of minutes! No more scrubbing and using 15 cotton balls per hand. I hope this little tip saves you some time and cotton balls next time you’re switching polishes!

Siggy paint


1

Continue Reading

It's Just Another Manicure Monday…Easy Going

0

Happy Monday, y’all! For today’s Manicure Monday, I’m sharing my favorite light pink polish. This “so light it’s almost white” pink is Sinful Colors Easy Going. My mom gifted me this polish a couple years ago, and I’ve loved it ever since.

1It only takes about two coats to become opaque, and it’s relatively easy to apply. The brush is definitely thinner than OPI or Sally Hansen Complete Salon Manicure. If you prefer a brush more similar to Essie, this would fit the bill.

2Want to know how it doesn’t compare to Essie? A bottle of Easy Going will only set you back $1.99 at most drugstores. That’s 75% cheaper than a bottle of Essie or OPI! Some people may claim the quality isn’t as good, but they’re full of it. Just kidding. I know next to nothing about nail polishes. I’m sure there are factors that make different brands superior, but, with a good topcoat, Sinful Colors polishes stay on my nails just as long as some of my pricier polishes. I think their colors are great for when you want to try something new but don’t want to break the bank.

3This particular color is perfect for welcoming spring and Easter! It’s the lightest of pinks, but it isn’t sheer or shimmery like many other pale pinks. It really pops on my hands, and I always get compliments when I’m wearing it! If you’re a fan of pastel shades for spring, I’d definitely give Easy Going a spin. And make sure to check out the Sinful Colors section next time you’re at your local drugstore…with over 60 shades under $2, you’re sure to find something to try!

Black all caps siggy

Continue Reading

It's Just Another Manicure Monday….Cloud

0

Better late than never, right? Squeezing in another manicure Monday with a couple of hours to spare! This week, I’ve been welcoming spring with Revlon’s Top Speed Nail Enamel in Cloud. Unfortunately (or fortunately, if you don’t like it), I don’t think they produce this polish anymore. It looks like Revlon still has a few bottles to sell via Amazon here.

1

I thought Cloud was a great polish for March because it is a crisp, light lavender (as opposed to a dark lavender?). The cool, rainy weather outside we’ve had doesn’t exactly scream “SPRING,” but it felt like I needed to brighten things up anyway.

2

I painted my nails in a rush before heading to sub one morning, and I must say, it did dry very quickly.Unfortunately, I only had time for 2 coats, and I think this polish really needs 3 to become opaque. I’m in favor of the high speed drying, but it’s kind of counterproductive if you have to add multiple coats to achieve the desired color. I also think the polishes marketed as “quick drying” chip easier. Sometimes the “saved time” isn’t an even trade off when you have to paint 7 coats, and it chips easily.

3If you want to rock a lavender nail for spring, maybe check out Essies’ Lilacism or Nice is Nice. I think lavender colors are perfect for someone wanting to branch out from traditional pinks/peaches/corals but doesn’t want to try anything too bold. Hope you add lavender to your spring nail color line up! (Like anyone has a spring nail color line up…ridiculous.)

Black all caps siggy


Continue Reading