wet n wild Color Icon Eyeshadow Trio in Plaid to the Bone

wet-n-wild-plaid-to-the-bone-0

I’ve been on a bit of a roll recently reviewing wet n wild’s Limited Edition Fall 2016 Collection. I figured I would continue the streak and share my thoughts about their other new Color Icon Eyeshadow Trio, Plaid to the Bone.

wet-n-wild-plaid-to-the-bone-1

Similar to Velour Vixen, this eyeshadow palette contains three shades designated for certain areas of your eye (Browbone, Crease, Eyelid). However, while Velour Vixen was all warm tones, Plaid to the Bone contains cool tones.wet-n-wild-plaid-to-the-bone-2

The “browbone” shade is a tan shimmer. While I wouldn’t use this on my browbone per se, it is a great transition or base shade. wet-n-wild-plaid-to-the-bone-3

The “crease” shade is a beautiful navy shimmer. This is my favorite color in the palette, and I used it to line my lower lash line as well. I think this would mix well with other shadows like copper or bronze.wet-n-wild-plaid-to-the-bone-4-5

Finally, the “eyelid” shade is a shimmer green with gold tones. It’s a very bizarre color and looks completely different swatched and applied than it does in the palette.  wet-n-wild-plaid-to-the-bone-4

I usually prefer plums, reds, or neutral browns for eyeshadow, so I was unsure of this palette when I purchased it and even when I applied it. I decided to try it for the first time on a day I was substitute teaching. Um, PRO TIP: DON’T try new makeup on a day you have to go out in public. wet-n-wild-plaid-to-the-bone-5

Since this palette definitely seems like more of an evening look to me, I ended up feeling a bit like a showgirl at school all day, but hey, life goes on. Also, looking at these pictures, the look isn’t quite as dramatic as I felt it looked in person that day. *Whew*wet-n-wild-plaid-to-the-bone-6

However, since this is a bolder shadow look, I would recommend pairing it with a more neutral lip color. I’ve yet to find a nude lipstick that doesn’t look like a concealer on me, so I stuck with an old faithful, MAC Viva Glam V.wet-n-wild-plaid-to-the-bone-7

These shadows are very pigmented, so a little goes a long way! I would recommend starting light and building up to your desired intensity, which shouldn’t take much product at all.wet-n-wild-plaid-to-the-bone-8

There is definitely a little bit of fallout, but lightly tapping your eyeshadow brush before application will help with that. I also applied Maybelline Eye Studio Color Tattoo Metal in Barely Branded as a primer. It helps my shadow stay put ALL day long.
wet-n-wild-plaid-to-the-bone-9

Will this be my new everyday shadow? Probably not. But I can see myself reaching for it in the future! I think it would be great for date night, or I would love to use the navy “crease” shade with a bronze shimmer.wet-n-wild-plaid-to-the-bone-10

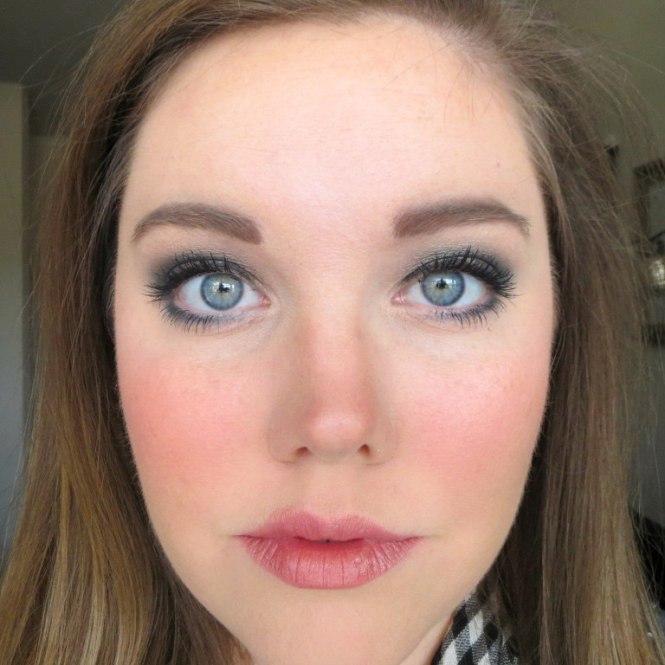
Not to mention wet n wild’s Plaid to the Bone shadow trio is only $2.99. For less than $3, you really can’t beat it! I have one more review from wet n wild’s Limited Edition Fall 2016 Collection still to come, so I hope y’all aren’t sick of beautiful makeup for amazing prices yet!

Retro Siggy

Primer: Nivea Men Sensitive Post Shave Balm

Foundation: Maybelline Fit Me Matte and Poreless Foundation 

Concealer: Maybelline Fit Me Concealer 

Setting Powder: e.l.f. Studio HD Translucent Powder 

Eyeliner: Maybelline Unstoppable Eyeliner in Onyx

Eyeshadow: Wet n Wild Color Icon Eyeshadow Trio in Plaid to the Bone

Eyeshadow Primer: Maybelline Eye Studio Color Tattoo Metal in Barely Branded

Mascara: Covergirl Super Sizer Fibers Mascara 

Blush: Wet n Wild Icon Blusher Pearlescent Pink

Highlighter: Wet n Wild MegaGlo Illuminating Palette

Bronzer: Physicans Formula Bronze Booster

Lipstick: MAC Viva Glam V

This post contains affiliate links, which means if you click on these links or make a purchase using these links, I may receive a small percentage of the profit at no additional cost to you. Thank you for supporting Hoots of a Night Al!

Continue Reading

Last Minute Halloween Treat!

0

Did any of you have your boss come up to you today and say, “Don’t forget, you’re in charge of Halloween treats for the team Friday?” Or perhaps you got that email at the end of the day from the classroom parent reminding you that there are 26 kids in little Susie’s class, and her party is on Halloween at 2:30? Maybe you just decided you want to whip up something fun for a friend, but you’re short on time.

Regardless of your situation, I think this little Halloween treat is fun and super simple! Louis’s birthday was a couple of weeks ago, and he swore up and down that he didn’t want a gift. I couldn’t let his day go by without giving him a little something though, so I capitalized on his love of candy corn and made this little gift.

1

I went to Target and picked up this over-sized mason jar and some black and orange baker’s twine (it was only $1!). Then, I hand wrote and decorated a little tag that said, “I hope you don’t think this gift is corny, but Happy 26th!!!” The message could be easily changed to “Happy Halloween!” or anything else, but I think it’s fun to work the “corny” joke in there somehow! “Don’t think I’m corny for saying you’re my favorite coworker/teacher/friend/etc.! Happy Halloween!” could be the perfect replacement.

2All this to say, if you need a simple, last minute, Halloween treat, here’s a solution! Both Target and Walmart have mason jars, gift baggies, and fun containers of every shape and price. This treat can be easily customized to fit whatever your Halloween needs are! Hopefully, this helps take a little load off of your shoulders, if you’re stressing about Halloween at all!

DottedSiggy


Continue Reading

DIY Crayon Sign

0

With the holidays quickly approaching, I figured it may be time to share a fun, little project I did awhile ago for one of my dearest teacher friends.

When Anne (aforementioned teacher friend) received her position as a kindergarten teacher, I knew I wanted to get her something for her classroom. I decided to personalize a sign for her using crayons (a major staple in the elementary world), and I wanted to share what I created!

1

There aren’t many supplies required for this project. All you need is a cork board (I selected one similar to this), a pack of crayons (never Rose Art unless you’re a horrible friend), a hot glue gun, a silver sharpie, and an X-Acto knife. I also printed out a large version of the letter I was creating to serve as a guide. I chose a simple serif font.

2

Once you have selected your shape, begin cutting your crayons to fit your guide.

3

Align your cut crayons to create your letter. Make sure everything looks straight and arranged correctly before using a glue gun to affix your crayons to the cork. As you can easily see, my crayons aren’t perfect, but curves are hard! (Why couldn’t your last name be Irwin or Irving, Anne?! Just kidding. 😉 )

You could be finished after this step. However, I decided to use a silver sharpie to write the rest of my friend’s name. I think it gives the project a more finished look.

4

And just like that, you’re done! I think this is a great, personalized and relatively simple gift you could create for any teachers in your life. For that matter it could be cute in a playroom or kid’s room, too!

I’m sure the teachers reading this are inwardly cringing and thinking, “Great, more homemade crap! Just what I wanted!” So…sorry about that, y’all. 🙂 Maybe if you’re gifting this to a teacher, pin a Starbucks giftcard on the cork board too, for good measure. 😉

Hope y’all like this DIY crayon sign as much as I do! Happy crafting!

DottedSiggy

Continue Reading