Covergirl The Super Sizer by LashBlast Mascara

1

I’m breaking out of my Maybelline bubble, to blog about Covergirl’s New The Super Sizer by LashBlast Mascara in Very Black. I have been seeing this promoted everywhere lately, so I picked up a tube to try myself.

2.5

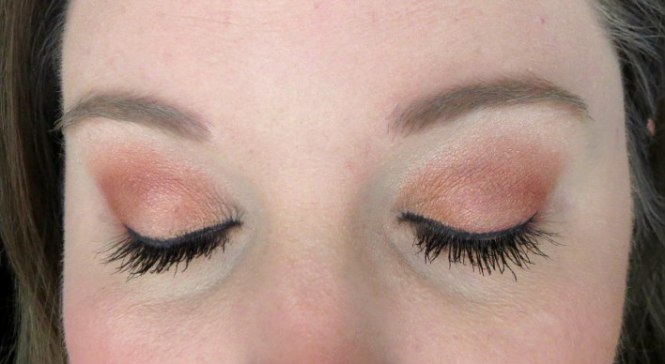
As you can see the wand is pretty unique. It is slender and the bristles are relatively short. The are attached in a sort of swirl, so you’re supposed to twirl the brush as you apply the mascara. I found the wand pretty easy to work with. It does take a little getting used to though.

2

It comes in 3 colors: Black Brown, Black, and Very Black. I always reach for the blackest mascara possible because I think it provides the most impact.

3

According to Covergirl, this mascara is supposed to provide “400% more corner-to-corner volume for full, fanned out lashes.” I think it mostly delivers.

4

My lashes definitely have more volume and length when I’m wearing this, BUT AT WHAT COST!? Hah, kidding. Drama aside, my lashes definitely clump when I’m applying The Super Sizer mascara, and the short-bristled, swirled brush isn’t the best tool for separating my lashes. Of course, if I work with it long enough, I can get it to work. However, other mascaras make clump-free lashes much more attainable.

5.5

Maybe to some people clumps equal volume? I much prefer separated lashes that are somehow volumized while remaining clump-free, but who am I to know what everyone wants?

5

The Super Sizer mascara is mostly flake-free, which is a plus. It doesn’t smear at all even in the heat, which is nice as well.

6

I have noticed a little bit of eye irritation when wearing this mascara, even though it is ophthalmologist tested. However, that could be due to allergies or another factor, I just wanted to mention it in case anyone reading has super sensitive eyes. You may want to avoid this one.

7

Another pro of this mascara is the price. From what I’ve seen it runs around $2 cheaper than many other drugstore mascaras…usually around $5-$6 depending on the store.

8

Overall, I’d give this mascara about a 7/10. Is it fabulous enough to make me abandon being a Maybelline Babebelline and try to be a Covergirl? Nope, probably not. (Also Maybelline Babelline was gross, I’m sorry.)

9

If you’re in the market for a new drugstore mascara though, I’d feel comfortable recommending it!

10

Covergirl’s The Super Sizer Mascara is available online, at drugstores, and at many big box retailers. If you decide to try it, let me know what you think!

11


As always, thanks so much for reading!

Siggy paint


*FACE MAKEUP: Maybelline Fit Me Foundation & Concealer

*LIPSTICK: Maybelline Lipstick in Vivid Rose

*EYELINER: Maybelline Unstoppable Eyeliner

*BRONZER: NYX Matte Bronzer


*This post contains some affiliate links, which means if you click on them or make a purchase using them, I may receive a small percentage. Thank you for supporting Hoots of a Night Al!

Continue Reading

Aveeno Ultra-Calming Foaming Cleanser and Nourishing Night Cream

0

I have always had issues with redness on my face, but a few weeks ago, it looked even worse than usual. I set out to find some new skincare products to try and help. I get so overwhelmed when it comes to picking out a new face wash, so I tried to narrow it down and specifically look for one that helped with redness.

1.5

Right away the Aveeno Ultra-Calming Foaming Cleanser jumped out at me. In its description it specifically says it helps reduce the appearance of redness through their trademarked ingredient “calming feverfew.”

1.7

I started using the cleanser that day, and I’ve been washing my face with it everyday for about two weeks. I must say, I’m super impressed! It helped reduce the redness on my cheeks within just a few days, and it’s gentle enough to use every night when I wash my face.

It’s good, not great, at removing my makeup. It gets off all of my face makeup easily, but I have to use a makeup remove to help get off my eye makeup most of the time. However, since I purchased it more for the redness calming property, I’m not complaining!

2

In conjunction with the cleanser, I purchased the Aveeno Ultra-Calming Nourishing Night Cream to use as my nightly moisturizer. I have used this every night as well, and I love it! It is smooth and creamy and soaks into my skin without leaving a greasy residue.

3

It hasn’t clogged my pores at all, and I think it has definitely aided the cleanser in reducing the redness on my cheeks and nose. Speaking of my nose, if you’re sensitive to smells, you may want to avoid this moisturizer. It claims to be fragrance free, but the Active Naturals Oat ingredient definitely gives it a yeast-like smell.  It kind of makes me feel like a Sandwich Artist at Subway. (I ignorantly assume they all smell like bread all the time.) It’s pretty strong at first, but I think it does fade relatively quickly.

4

The ultra-calming line also has make-up removing wipes and a daily moisturizer. I have used the makeup-up wipes before, and they’re also great!

If you struggle with facial redness, you should consider purchasing some products from the Aveeno Ultra-Calming line. I don’t think you’ll be disappointed!

Siggy paint


This post contains affiliate links, which means if you make a purchase using these links, I may receive a small percentage of the profit at no additional cost to you. Thank you for supporting Hoots of a Night Al!

Continue Reading

Easy Minimal Nail Art

Easy Nail Art 0

I’m no artist. Let me get that out of the way up front! My handwriting isn’t great, I can’t draw worth a poot, and in general, I’m not super artistic. However, I love painting my nails (okay…that’s a lie, but I love having painted nails), and I’ve always wanted to add a fun accent to them. I’m not big on the different color accent nail trend, but I still love a fun pop of nail art, and this is the perfect compromise!

Easy Nail Art 1

All you need for this minimal nail art look is Scotch tape and two colors of polish. I used Sally Hansen Complete Salon Manicure in Naked Ambition  (previous review here) and Revlon Nail Polish in Minted. For an even more minimalist look, you could paint the nail art on your naked nail, which would only require one polish (duh.).

Easy Nail Art 2

Paint your nails whatever base color you choose. Once they are completely dry, tear off two pieces of Scotch tape. I usually stick the tape on my hand and peel it off once to pick up some dead skin cells make it slightly less sticky. It needs to be sticky enough to stick onto your nail, but not so sticky it will pull off your base polish.

Stick the tape to your nails to form a triangle shape however large or small you’d like.

Easy Nail Art 3

Use your secondary color to paint over the tape and fill in the triangle shape you created. As soon as you’re done painting, peel off the tape to reveal your perfect triangle! Make sure you peel off the tape while the polish is wet, so you don’t accidentally pull up the dry polish with the tape. You can also add a top coat afterwards, if that’s your jam.

Easy Nail Art 4

Voilà! You’re done! I think this look is so fun, and I love that you can create so many looks with different colors and without any special nail art tools.

Easy Nail Art 5

You could paint the triangles on every nail or just one finger, like I did. The tape is fun to play around with as well because you could use it to make any number of shapes or designs on your nails.

Easy Nail Art 6

If you try this nail art, share a picture of it on Instagram and tag me! I’d love to see! 🙂 Feel free to pin the image below to help you remember the simple steps in the future!Easy Nail Art 7

As always, thanks for reading!

Siggy paint

This post contains affiliate links, which means if you make a purchase using these links, I may receive a small percentage of the profit at no additional cost to you. Thank you for supporting Hoots of a Night Al!


Continue Reading

Maybelline Master Precise Skinny Gel Pencil

0

Today, I’m reviewing the Maybelline Precise Skinny Gel Pencil. As anyone who’s read my blog before knows, I’m a huge fan of Maybelline’s eye products1

This new addition to their collection is a fabulous one! It is a twist up pencil, which is my favorite kind. I love the convenience of not having to worry about sharpening it. Also, does anyone else always stab themselves in the eye with wooden shards with the pencils you have to sharpen? Just me? Great.

2

Another notable feature of the Master Precise Skinny Gel Pencil is how skinny it is. Surprise, surprise, I know. It measures only 1.8 millimeters, which allows you to get a SUPER thin line.

3

The thin line is convenient for lining your lid, tight-lining your inner lid, and lining under your eye. It’s also easy to build up for a more dramatic look.

4

The one downside to the pencil’s thinness is that it easily breaks if you wind it out too far. I made this mistake the first time I used it. However, if you keep it pretty short, you won’t have any issues!

5

This pencil glides on really easily during application, and it doesn’t smudge throughout the day.7

The gel liner claims to be waterproof, but I haven’t put that to the test. Thankfully, it comes off relatively easily when I use my Garnier Micellar Water to remove it.

89

I’m wearing the Master Precise Skinny Gel Pencil in Defining Black, which is my go to eyeliner color. It also comes in Brown and Gray.

1011

I paired this eyeliner with my current favorite Maybelline Mascara, Lash Sensational, and they work together great!

1314

As you can see below, the Maybelline Unstoppable Liner is at least twice as thick as the new Master Precise Skinny liner, which could be good or bad based on how much drama you want.  The good thing is both of them can be built up.

15161720

I’m still a huge fan of Maybelline’s eye makeup products, and I don’t expect that to change anytime soon! I definitely recommend the Maybelline Master Precise Skinny Gel Pencil if you’re in the market for a new, affordable, great eyeliner!

Siggy paint

21

This post contains affiliate links, which means if you make a purchase using these links, I may receive a small percentage of the profit at no additional cost to you. Thank you for supporting Hoots of a Night Al!

Continue Reading

Nail Polish Removal Hack!

0

Does anyone else out there paint their own nails still? I love having fresh polish on my nails, but one of my least favorite things to do is remove it! I feel like some polishes (like glitter!) can be so stubborn and hard to get off. However, a couple of years ago, I stumbled upon this “hack.” With nail polish remover and ONE cotton ball, I can remove ALL of my polish quickly and easily! Read on to see how!

2

You can use acetone (which is harsher on your nails) or nail polish remover. Simply pour a small amount into the cap. Next get one cotton ball and roll it out into a strip like the picture below.

3

Gently, tear your cotton ball into ten small pieces.

4

Dip each piece into the nail polish remover, and press it onto your  nail making sure any part with polish is being touched by the polish remover. I typically do one hand at time.

5

Wait for around 15 seconds, grab the cotton ball piece, and slide it off your nail with some slight pressure. Voilà! Just like that, all of your polish is gone! 6

Like I said, I do one hand at a time, and it just takes a couple of minutes! No more scrubbing and using 15 cotton balls per hand. I hope this little tip saves you some time and cotton balls next time you’re switching polishes!

Siggy paint


1

Continue Reading